
Mobile device detours
Jul 14, 2025
Back to the release learning center
The Warehouse mobile app (WMA) is the warehouse worker’s entry point into the D365 WMS. For many organizations, workers will never directly interact with the WMS, but rather will only work via the WMA. The app is now (nearly) on it’s 4th version, which is a complete re-write of the application in React Native. Microsoft claims a significant performance boost (not from warehouse process execution, but rather app function execution), along with a redesigned UI, better network connectivity, and much more. To learn more about the WMA, check the Microsoft Learn documentation here, or you can watch a TechTalk on the new version of the application and all the functionality it has at the end of this blog post.
Now, while the app is great and provides tons of great functionality, as implementers of the solution, we are very limited in what we can do with the app. We cannot change the colors or the layout of the app, and have to follow some pre-defined patterns in how the screens render. The XML-based interface between D365 and the WMA is the communication layer, and that is unchanged through all the versions and rewrites. Customizing the app is possible, such as introducing new workflows and adding fields, but performing these customizations is often complex if not approached correctly and can be risky.
So what can we do? Introducing: Mobile device detours!
Mobile device detours – the basics
Mobile device detours are not new. They are, however, incredibly helpful in reducing potential customizations in the mobile device. Mobile device detours were first released in version 10.0.23 and iterated on for a few subsequent versions. And we use them in every implementation we work on. Simply defined: detours give you the ability to access a menu item directly from the context of a menu item, rather than having to leave the workflow you are in.
The first component to understand is the step. The logic which executes warehouse actions in the WMA is written in such a way where each screen can be viewed as a step. The steps themselves can be confirmations, inputs, etc., and these steps are now represented on a form called Mobile device steps (Warehouse management > Setup > Mobile device > Mobile device steps).

You can identify the step on this form based on either the Title for input or Title for confirmation fields and comparing that with the text you see in the mobile device. In this case we want the ability to look up something directly from this screen in the Movement menu item.

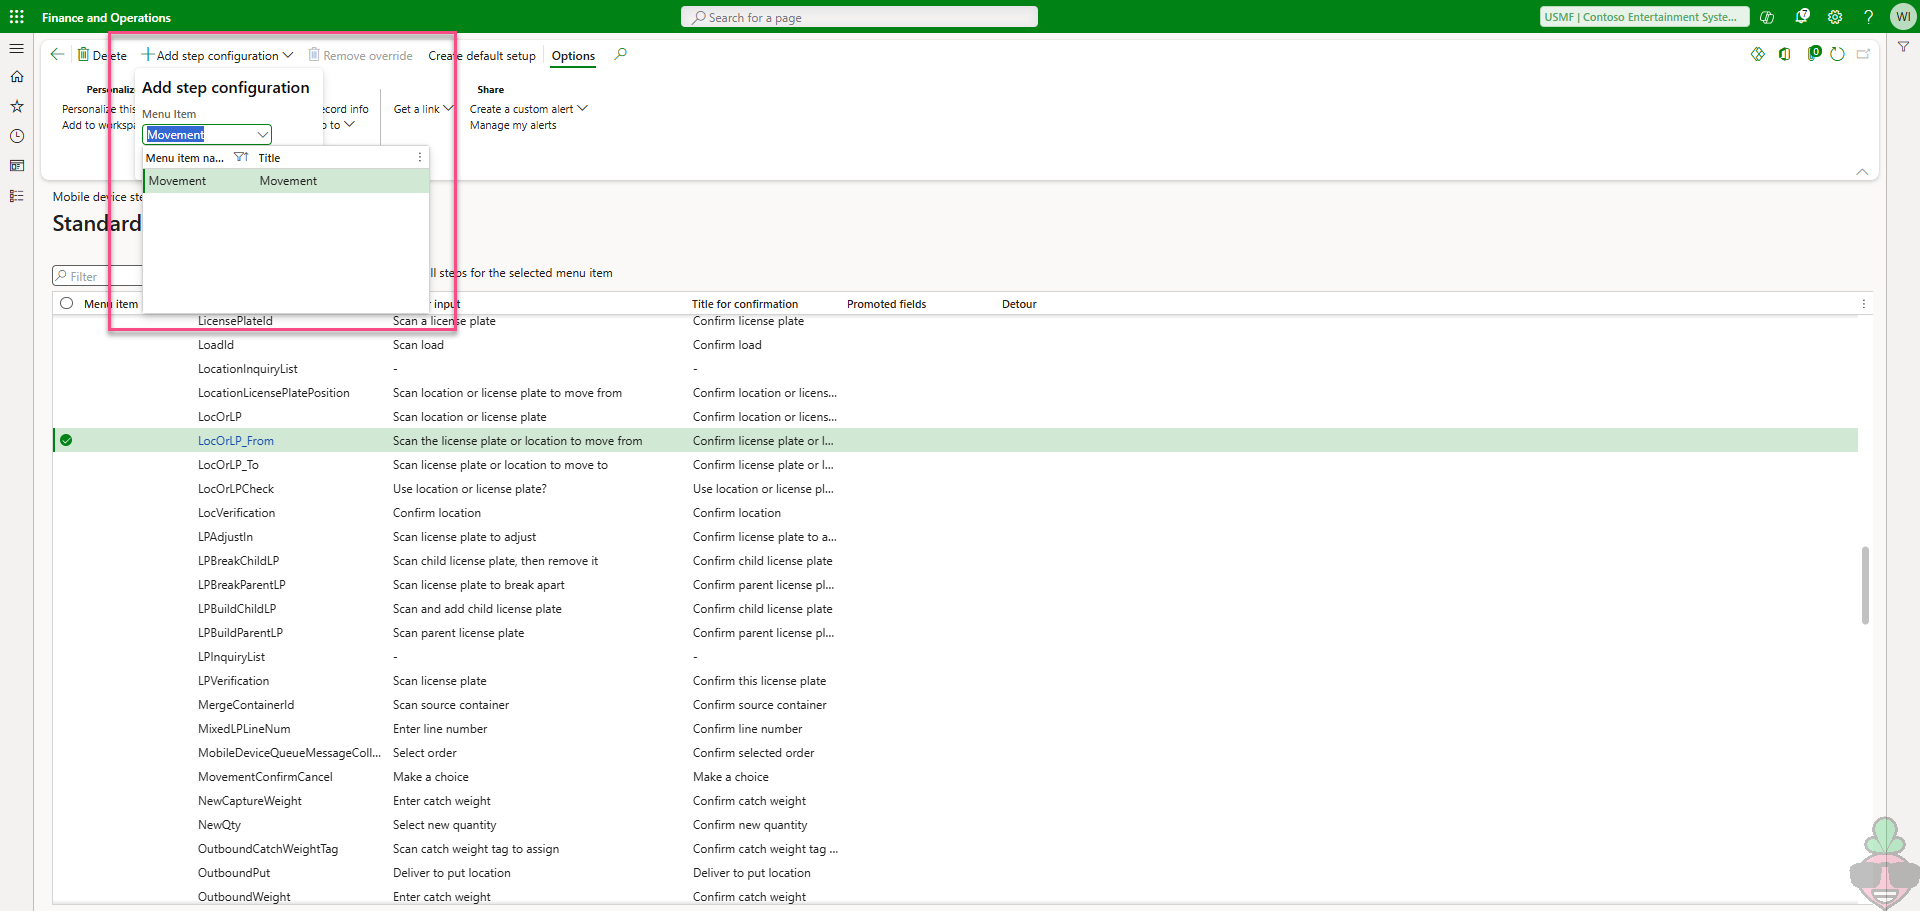
The next step (no pun intended) with Mobile device steps is to add a step configuration to the step you’ve selected. This is configuring on which menu item this detour should be available. By configuring a detour on this step, we’re not adding it to every menu item that has that step, only to the menu items which we’ve specified by associating the menu item to the step via the step configuration, as shown below.
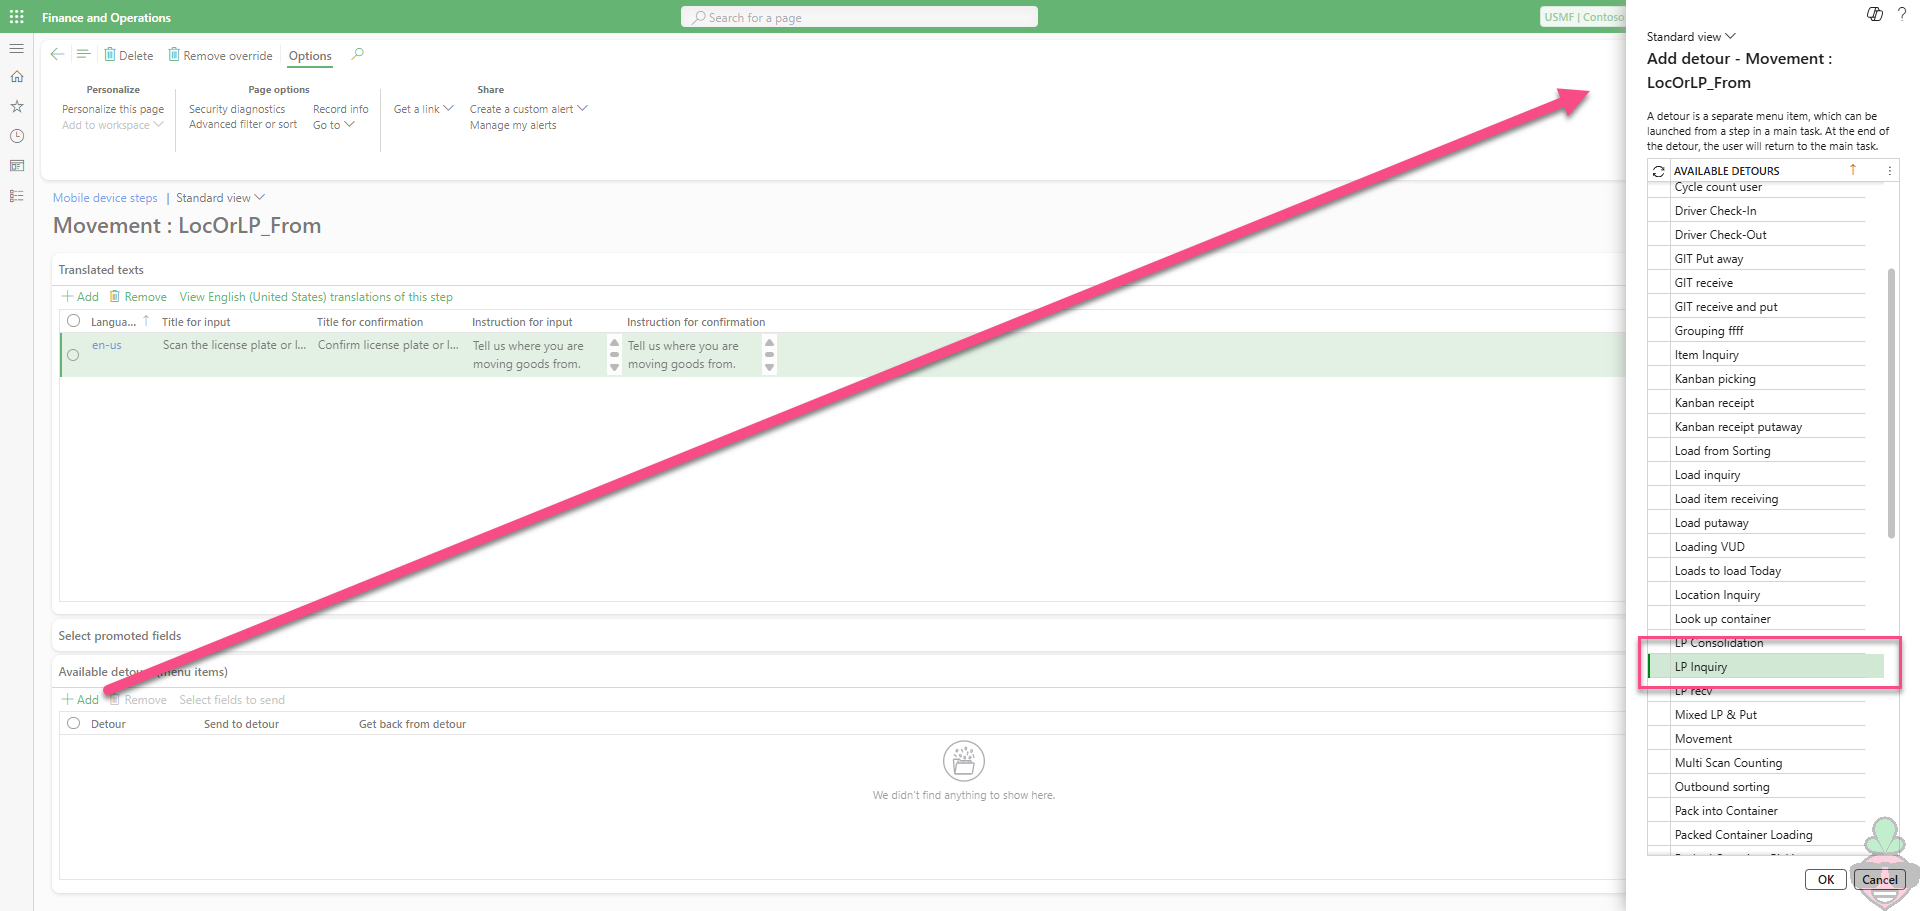
Once confirmed, you’re brought to the step configuration page (Mobile app flow step list page). The first two fast tabs are for adding different translations and being able to promote certain fields for certain steps (useful, but not covered in detail in this post). The third fast tab is where the detour magic happens: Available detours (menu items). To configure the detour, expand that fast tab and select Add. You’re then shown a screen of all the available menu items where you could add a detour. From the Movement menu item first input step (Scan license plate or location from) we want to detour to look up a license plate. So from here, we’ll select the LP inquiry menu item and confirm.
Now if you navigate to the Movement menu item in the mobile device, you can see the LP inquiry menu item detour available from the LocOrLP_From mobile device step:

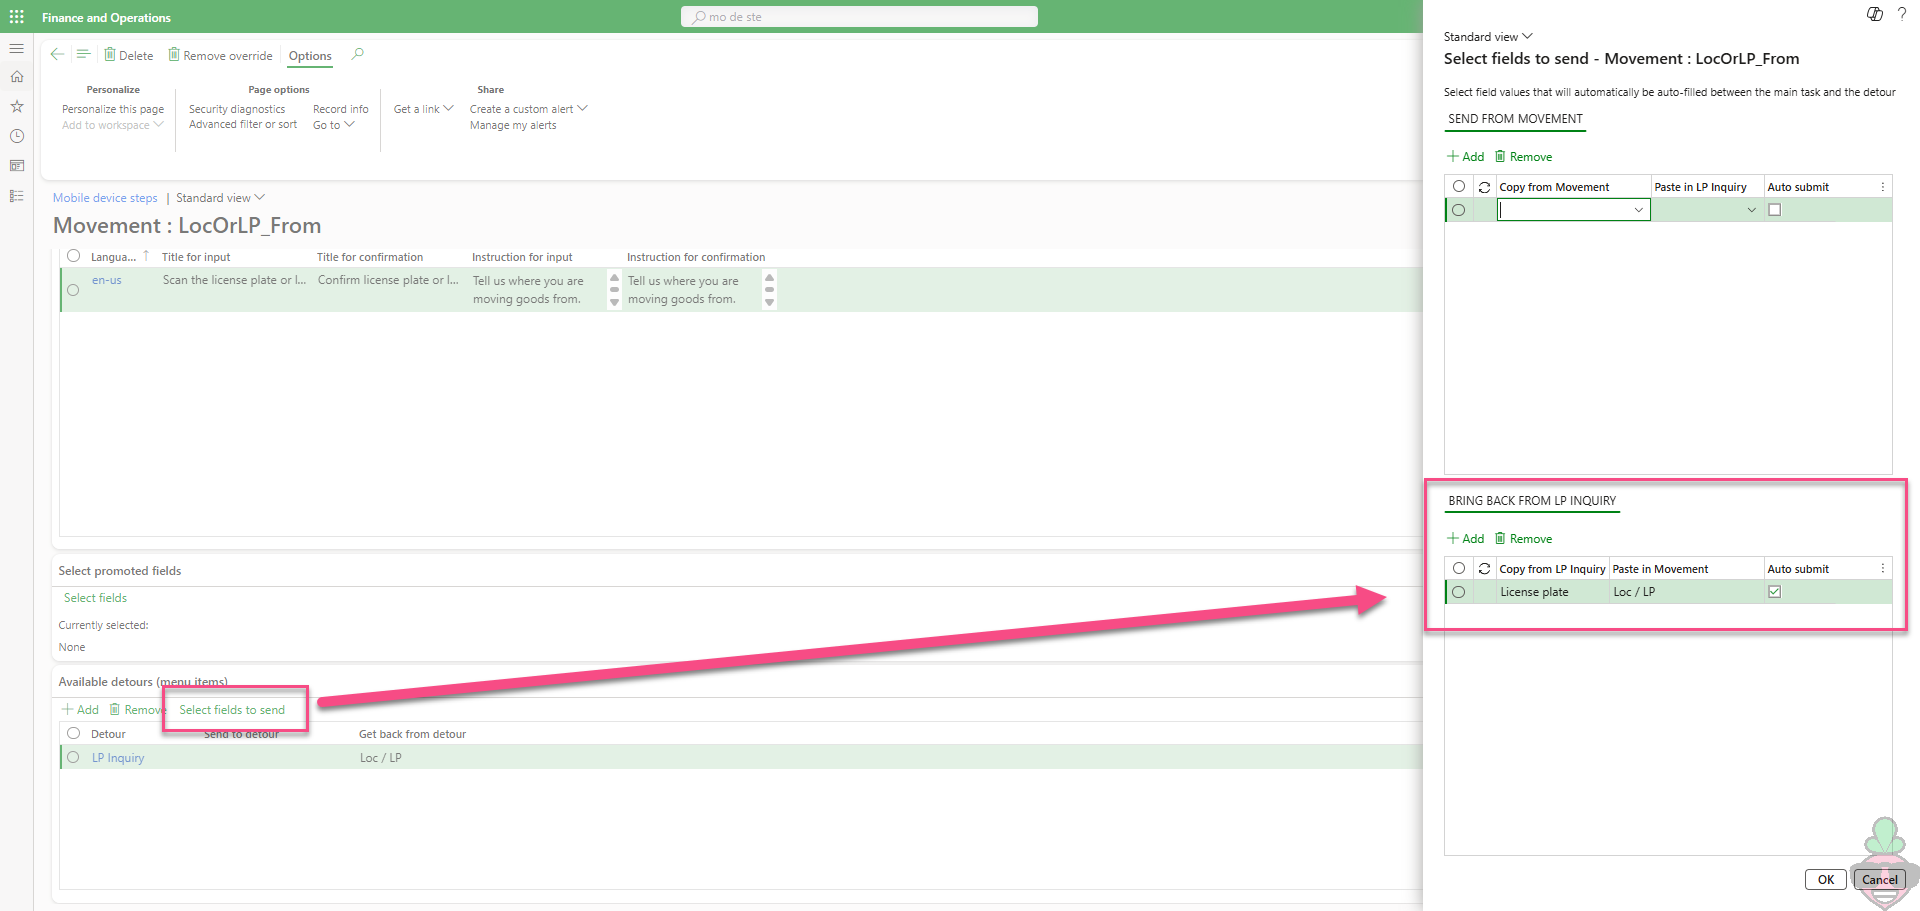
To take it one step further, we can also configure the detour to send data bi-directionally. We can send field data from the step we are currently on to the detour step, or return data from the detour step to the origin step. On the Mobile device steps form, select Select fields to send to configure the data submission/retrieval. The dialogue is split into two sections: SEND FROM MOVEMENT and BRING BACK FROM LP INQUIRY. It’s only possible to send data to the detour step if we are in the context of sending an input data point. For example, if we’ve input a load ID and confirmed that step, we could theoretically send the load ID to a detour where the detour would expect the load ID as an input. Same concept for retrieving data from the detour step but in reverse – we can only bring data back from the detour step if the input is expecting that value. In this case we can bring back the license plate from the LP inquiry menu item, because we’re detouring from the LocOrLP_From step, which expects either a location or a license plate. And finally, to reduce clicks, Auto submit can be configured to automate the return key in the WMA, meaning that it not only inputs the data sent or retrieved from the step, but confirms the step, progressing automatically to the next one.
All put together the process in the WMA now looks like this:
What’s the point?
Let’s explore this very simple example where a worker needs to move pallets in a warehouse. The worker always starts in a Movement menu item, and sometimes before they execute the movement, they want to cross-check the license plate contents in the system with what they’re seeing physically. The process flow may look something like this:

The detour will come into play with the subprocess “Worker validates LP via WMA.” Without the use of detours, this is what the subprocess looks like:

Not inherently problematic, but a lot of clicks. The worker has to exit the existing menu item (click 1), enter the LP inquiry menu item (click 2), scan the license plate barcode, then exit the LP inquiry menu item (click 3), and finally enter back into the Movement menu item (click 4).
In the first iteration of this example, we configured the detour to achieve the following subprocess flow:

The worker directly enters the LP inquiry menu item from the Movement menu item (click 1), scans the license plate barcode, exits the LP inquiry menu item (click 2), and re-enters the Movement menu item (click 3).
In the next iteration of this example, we configured the detour with the auto-submission of data retrieved from the detoured step to achieve the following subprocess flow:

The worker directly enters the LP inquiry menu item from the movement menu item (click 1), scans the license plate barcode, selects the detail presented on the screen (click 2), and the configuration brings the worker directly to the second screen in the movement flow after the license plate is input.
Through this example, we can see that in this process flow we’ve removed 2 clicks from each instance where a worker is moving a pallet and needs to double-check the contents.
Conclusion
The scenario detailed in this post is a very good example of an apt application of detours. They are fantastic for exception scenarios in warehouse processes. There are numerous applications: reprinting of labels, selecting items, identifying inbound loads or purchase orders for the day, etc. They are perhaps a bit heavy handed for standard processes (e.g. the packing process…).
It is important to note that when developing new mobile device process flows, it is not native that you will be able to detour into that flow: this requires special consideration in the development.
For more information on detours or their applications, or to learn more about the mobile device and all you can do with it, reach out to our team and let us help you elevate your warehouse operations!
